Measuring Your Product for Custom Packaging
When it comes to creating custom packaging, one of the most important steps is measuring your product accurately. Without the right dimensions, your packaging may end up being too tight, too loose, or unable to protect your product properly. Correct measurements ensure your packaging not only looks professional but also provides safety during shipping, storage, and handling.
Why Accurate Measurements Matter?
Custom packaging is designed to fit your product perfectly. Inaccurate measurements can lead to:
- Increased damage risk: Loose packaging allows products to move around during transit.
- Higher shipping costs: Oversized boxes mean paying for unnecessary material and space.
- Unprofessional look: Ill-fitted packaging can hurt brand presentation and customer experience.
Getting the measurements right ensures a snug fit, saves money, and boosts your brand image.
Tools You’ll Need
Before you begin, gather a few simple tools:
- A ruler or measuring tape (preferably in both inches and centimeters).
- A notebook or digital device to record measurements.
- Calipers (optional, for small or delicate items).
Key Dimensions to Measure
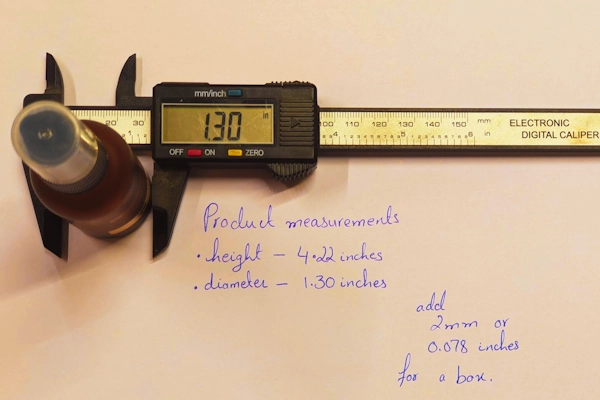
When measuring your product, always consider length, width, and height—but also keep in mind product shape and additional elements like padding or inserts.
- Length – Measure the longest side of your product.
- Width – Measure the shorter side of the base.
- Height/Depth – Measure from the bottom to the top of your product.
For irregularly shaped products, measure the widest points. For items with handles, protrusions, or accessories, include those in your measurement.
Pro Tip:
If your product is soft (like clothing, soap, or plush toys), measure it in its packaged form (folded or wrapped), not in its loose form.
Adding Extra Space
Custom packaging doesn’t always mean an exact fit. You may need to add extra room depending on the packaging type:
- Protective packaging (fragile items): Add 0.5–1 inch to each side for inserts, bubble wrap, or foam.
- Retail display packaging: A snug fit may work best for a sleek and professional appearance.
- Multiple products in one box: Measure the combined dimensions and leave extra space for dividers or inserts.
Common Mistakes to Avoid
- Measuring only the product: Always consider padding, inserts, and protective layers.
- Not rounding up: Always round measurements up slightly to avoid a tight squeeze.
- Overestimating space: Too much empty space can make packaging bulky and less secure.
Final Thoughts
Measuring your product for custom packaging is a simple but crucial step in designing the perfect box. Accurate dimensions save money, protect your items, and enhance customer satisfaction with a professional unboxing experience. Whether you’re packaging candles, electronics, clothing, or luxury goods, the right fit is key to making a lasting impression.